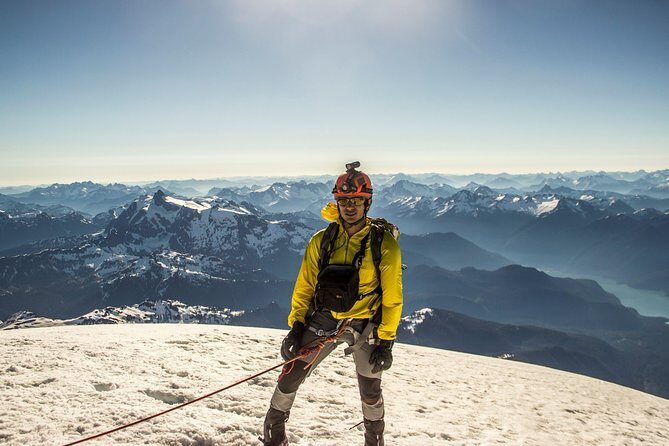
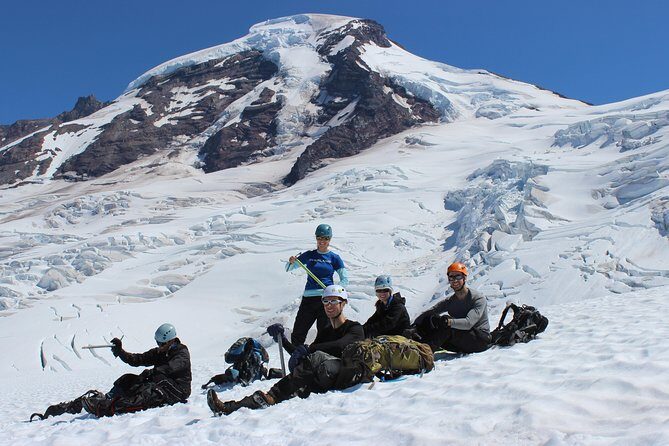
Mount Baker teaches humility fast. This 3-day climb from Seattle takes you onto the Easton Glacier / Coleman-Deming approach with serious route-finding through icefalls, seracs, and crevasses, led by a team built for learning. I also like the small group (max 15) setup, because you get more time for feedback while you’re moving through real glacier terrain.
I also like the way the big stuff is handled for you: permits are covered and you get tents, stoves/cook kits, and group climbing equipment as part of the package. One drawback to plan around: weather can change the summit day, and meals/hot drinks/snacks are not included, so you’ll need to pack your energy and flexibility.
In This Review
- Key points before you sign up
- Entering Mount Baker with pro guidance (and a tight group)
- Easton Glacier vs Coleman-Deming: how route choice changes your day
- Glacier skills on a clock: ice axe arrest, crampons, and rope team work
- Cold-weather camping and the real rhythm of a 3-day climb
- Navigation, hazard assessment, and knot skills that actually keep you safe
- Summit-day reality: when the mountain changes your plan
- Price value: what you pay for, what you don’t, and why it matters
- From Seattle to the start: meeting time, mobile ticket, and pacing
- Who should book this Mount Baker climb (and who should think twice)
- Should you book this Mount Baker Climb Tour?
- FAQ
- How long is the Mount Baker Climb Tour?
- Where do we meet in Seattle, and what time does it start?
- Which route will we climb on Mount Baker?
- Who is this tour meant for?
- What skills will I learn during the climb?
- Is climbing gear and camping equipment included?
- Are permits included?
- What is the maximum group size?
- Are meals included?
- Can the itinerary change due to weather?
Key points before you sign up
- Small group limit (15 travelers): more coaching time and better control on steep ice.
- Permits covered in the price: less paperwork stress and fewer “surprise” costs.
- Gear is included: tents, stoves/cook kits, and group climbing equipment come with the tour.
- Real skills, not just a summit chase: ice axe arrest, crampons, rope management, navigation, hazard assessment.
- Route-finding through glacier hazards: Easton Glacier or Coleman-Deming with practice around crevasses/icefall terrain.
- Summit plans adapt to conditions: you may shift the attempt and add skills time depending on weather and safety.
Entering Mount Baker with pro guidance (and a tight group)
This Mount Baker climb is designed for people ready to move beyond hiking, but not yet confident on steep glacier travel. The vibe is practical: you learn how to walk safely on ice, how to move as a rope team, and how to judge hazards before you chase the top.
The small group cap of 15 matters more than it sounds. On glaciers, everyone’s pace and technique affects the whole rope team. A smaller group also means your guide can spend extra moments correcting crampon placement, rope positioning, and cold-weather habits before they turn into mistakes.
You’ll likely feel that coaching approach reflected in the guide attention people talk about by name. Guides such as Josh, Andrew, Sam, Simon, Drew, and Caleb show up repeatedly in real experiences—often praised for safety-first decisions and clear teaching during the hard parts.
If you're still narrowing it down, here are other tours in Seattle we've reviewed.

Easton Glacier vs Coleman-Deming: how route choice changes your day
On this 3-day tour, you climb Mount Baker using either the Easton Glacier route or the Coleman-Deming route. What I like here is that the route isn’t treated like a shopping choice—it’s treated like a terrain challenge, and the guide team navigates the reality of icefalls, seracs, and large crevasses.
Even if you’ve studied maps, glacier travel has a “show me” side. You’re not just looking at lines on a page. You’re practicing route-finding through moving ice, and that’s where the guide’s experience earns its keep.
What to consider: glacier conditions can change fast. So even if the overall plan is the same—learn glacier fundamentals, then attempt the summit—your exact timing and how hard the terrain feels can vary based on visibility, snow/ice conditions, and safety assessments.
Glacier skills on a clock: ice axe arrest, crampons, and rope team work
This tour stands out for the way it teaches the skills you actually need to stay safe. Before you’re thinking about summiting, you build core glacier mechanics like:
- Self-arrest with an ice axe (your emergency brake)
- Using crampons correctly (so your feet bite instead of slip)
- Walking techniques with and without crampons
- Attaching to a rope team and managing that system while moving
That may sound like “classroom stuff,” but it’s not theory. It’s repeated technique on snow and ice until your body gets the pattern. And if the weather turns, those fundamentals become your best “plan B,” because you can keep learning even when the mountain says not today.
I also appreciate the way prep emphasizes the simple-but-hard balance of gear. You’ll do packing guidance and a gear check at least three days prior to ensure you’re carrying what matters—and not burying yourself in useless weight. That’s one of the fastest ways to improve comfort on a cold multi-day climb: pack light where it’s safe, pack correctly where it’s critical.
Cold-weather camping and the real rhythm of a 3-day climb
Because the tour includes tents and stoves/cook kits, you’re not just day-tripping and hoping for the best. You’ll be living on the mountain for multiple nights, and the skills taught include cold-weather camping basics.
That matters because glacier safety isn’t only about what you do while climbing. It’s also about how you handle exposure, how you set up camp, and how you move in and out of camp when you’re tired. The skills list explicitly includes cold weather camping skills and Leave No Trace, which is a good sign that guides aren’t only focused on the technical side.
Also, meals are not included—so you’ll want to bring planning habits you can manage in cold conditions. Stoves and cook kits are provided, but you’ll supply your own food, hot drinks, and snacks. On a cold summit attempt window, having the right calories and drinking habits can make the difference between feeling steady and feeling ragged.
Navigation, hazard assessment, and knot skills that actually keep you safe
Mount Baker isn’t a “follow the trail and enjoy the view” peak. The tour includes navigation and route finding practice, plus hazard assessment—and those two go together.
When you’re walking across glacier terrain, hazards are often invisible until they’re not. Crevasses hide under snow bridges. Icefalls change their look as conditions shift. Seracs and steep ice sections demand attention to timing and spacing. This is where a guide’s judgment matters, and where your own decision-making gets trained.
You’ll also cover climbing knots, glacier travel skills, and rope management. In plain terms: you learn how to move with a system, how to reduce slack or confusion, and how to keep everyone connected without wasting energy. If you’ve never worked in a rope team before, this is the right place to start—because the whole trip is structured to teach those mechanics as part of the climb.


Summit-day reality: when the mountain changes your plan
One of the most useful things about this tour is that it’s built to respect weather. There’s a clear note that the summit attempt might shift: depending on conditions, the summit day may move to the second day, with a relaxed hike out and extra sleep on the third day.
That flexibility is not a downgrade. It’s a mature approach. Bad visibility and unsafe route conditions aren’t something you “push through” by willpower. A safety-first call may mean you get a different kind of win: more time for skill reps, better technique practice, and a stronger ability to attempt again later.
If weather keeps you from reaching the top, you’re not sent away feeling like the trip failed. The way guides talk about safety and re-framing a turning-point day shows up clearly in the experiences people describe—especially when guides turn the time into focused instruction instead of wasted waiting.
Price value: what you pay for, what you don’t, and why it matters
You don’t get a bottomless buffet of inclusions here—but you do get the big-ticket essentials that make glacier climbing expensive or complicated to assemble.
Included highlights worth real money and stress reduction:
- All permits covered
- Guide services
- Tents
- Stoves/cook kits
- Group climbing equipment
- Pre-trip planning/info session on packing & gear
- Backpacking/mountaineering/outdoor safety skills instruction
Not included items to budget for:
- Transportation
- All meals, hot drinks, and snacks
- Gratuities for guides
How this becomes value for you: glacier trips fail quietly when people under-prepare. If you have to scramble for tents, stoves, and critical group gear, you lose time and money—and you arrive less confident. Here, the tour handles those fundamentals, so your cost mostly turns into coaching, permits, and mountain time.
The transportation part is the main wildcard. The tour helps arrange carpools or can provide transportation for extra fees, but you should plan early so you’re not stuck last-minute figuring out how to get from Seattle to the start of the climb.
From Seattle to the start: meeting time, mobile ticket, and pacing
The tour starts in Seattle with a meeting setup built around early mornings. Your start time is listed as 7:30 am, with pickup details saying to meet at a convenient Park and Ride in the Seattle area at 8:00 am. If you’re not already familiar with Seattle-area traffic, I’d treat this like a “be early, not perfect” moment.
You’ll also receive mobile ticket details and the tour is offered in English, so you’re not guessing about communication in the days leading up to the climb.
In terms of fitness, you should have moderate physical fitness, and the climb is meant for experienced hikers who want to start mountaineering. That means you can hike for hours, but you may not yet understand crampon walking, rope systems, or arrest techniques. If that’s you, this kind of structured coaching is exactly the point.
Who should book this Mount Baker climb (and who should think twice)
This tour fits best if you:
- Are an experienced hiker ready to learn glacier travel basics
- Want hands-on instruction: ice axe arrest, crampons, rope management, hazard assessment
- Appreciate a small group and a guide-led safety culture
- Can handle a schedule that may shift if conditions demand it
You might think twice if you:
- Want a guaranteed summit no matter what (this mountain won’t promise that)
- Are unwilling to self-provide your meals and hot drinks for multiple days
- Prefer fully independent climbing without ropes, knots, and structured technique work
If you’re aiming to step up into intermediate climbs later, this kind of start-to-finish skill build is the right ladder. The program is even described as a foundation for future intermediate climbs on Mt. Baker and other Cascades objectives.
Should you book this Mount Baker Climb Tour?
I’d book it if your goal is to learn Mount Baker the smart way: with permits handled, gear covered, and coaching that drills glacier fundamentals before summit pressure shows up. The best part isn’t only the peak—it’s the way the trip turns uncertain mountain conditions into structured practice.
I wouldn’t book it if you need an easy logistics experience with meals included, or if you’d be seriously disappointed by a summit-day change. The trip’s flexibility is a feature of safety, not a marketing trick.
If you’re ready to pack carefully, listen to your guide, and train your body for glacier movement, this is a strong value way to start mountaineering on one of North America’s most sought-after climbs.
FAQ
How long is the Mount Baker Climb Tour?
It runs for about 3 days.
Where do we meet in Seattle, and what time does it start?
You meet in Seattle at a Park and Ride. Pickup is listed for 8:00 am, with a start time of 7:30 am.
Which route will we climb on Mount Baker?
You’ll climb via either the Easton Glacier route or the Coleman-Deming route.
Who is this tour meant for?
It’s meant for experienced hikers who want to start mountaineering, with moderate physical fitness.
What skills will I learn during the climb?
You’ll cover skills such as ice axe positions and self-arrest, using crampons, walking techniques with and without crampons, climbing knots, glacier travel skills and rope management, navigation and route finding, hazard assessment, cold weather camping skills, and Leave No Trace.
Is climbing gear and camping equipment included?
Yes. The price includes all equipment, including tents and group climbing equipment.
Are permits included?
Yes. All permits are covered by the tour price.
What is the maximum group size?
The group size is capped at 15 travelers.
Are meals included?
No. Meals, hot drinks, and snacks are not included. Stoves/cook kits are included, though.
Can the itinerary change due to weather?
Yes. Depending on conditions, the team may change the summit day and adjust the plan, including a more relaxed hike out on the third day if needed.